Workflow management with DAGMan
Objectives
- Learn about graphs as they relate to computation
- Learn how a graph manager can implement a workflow management system
- Use DAGMan to manage a set of molecular dyanmics calculations
- How to write a DAGMan input file for a workflow
Overview
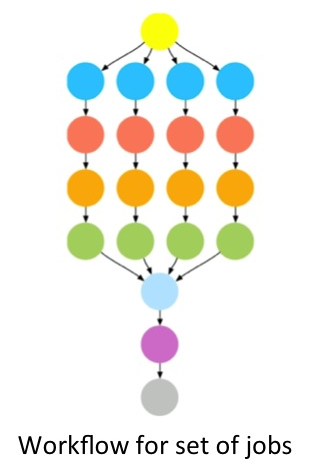
In High Throughput Computing, one is typically faced with having to manage a large set of computational tasks. This can include situations in which tasks may depend on one another. Workflow management systems can help relieve job management burden for you, the user. DAGMan (Directed Acyclic Graph Manager) is a workflow management system based on graphs (see figures below) build into HTCondor. DAGMan handles sets of computational jobs that can be described as a set of nodes in a "directed acyclic graph". This means that the job dependencies do not form a loop, see "Cyclic" vs. "Acyclic" figure below.

In this tutorial, we will learn how to apply DAGMan to help us manage jobs and job interdependencies. First, we will revisit the optimization example from in the previous section. Second, we will manage a set of molecular dynamics (MD) simulations using the NAMD program. NAMD is conventionally used in highly parallel HPC settings, scaling to thousands of cores managed by a single job. One can achieve the same scaling and ease of management in HTC systems using thousands of individual jobs using workflow tools such as DAGMan.
Running Jobs with DAGMan
DAGMan offers an elegant and simple solution to reduce the management burden on you (the user) if you have more than a handful of jobs to run or there are jobs that dependent on each other. For example, if you have a set of jobs that may take longer than 2-3 hours to complete, a subset of your jobs may be terminated prematurely. Managing the resubmission of prematurely terminated jobs manually is not practical in most cases. DAGMan tracks which jobs were terminated prematurely, and allows you to resubmit the terminated jobs with one command. Similarly, if you have a set of jobs that depend on each other in some way, DAGMan has the functionality to allow you define these dependencies and manage them for you.
Job Management with DAGMan
The first examples, we will revisit the example from the previous section. In this example, we had a job that we first wanted to execute a several times and subsequently with a set of input parameters.
The DAGMan script and the necessary files are available to the user by invoking the tutorial command.
$ tutorial dagman-namd
$ cd tutorial-dagman-namd/JobManagementDAG
The directory tutorial-dagman-namd/JobManagementDAG contains all the necessary files. The file jobmanagement.dag is the DAGMan input file.
Let us take a look at the DAG file jobmanagement.dag.
$ cat jobmanagement.dag

######DAG file######
##### Define Jobs ###
#####  JOB JobName JobDescriptionFile
JOB A0 run_job.submit
JOB A1 run_job.submit
JOB A2 run_job.submit
JOB A3 run_job.submit
To define a job (or node in DAG lingo), we have a line beginning with the keyword JOB followed by a unique identifier for that job, for example, A0 for the first job and, the HTCondor submit file to be used, i.e. run_job.submit. A line starting with pound (#) character is a comment. The submit file run_job.submit is the same as in the previous example modulo the last time that now reads Queue 1, see:
$ cat run_job.submit

# The UNIVERSE defines an execution environment. You will almost always use VANILLA.
Universe = vanilla

# These are good base requirements for your jobs on the OSG. It is specific on OS and
# OS version, core, and memory, and wants to use the software modules.
Requirements = OSGVO_OS_STRING == "RHEL 6" && TARGET.Arch == "X86_64" && HAS_MODULES == True
request_cpus = 1
request_memory = 1 GB

# executable is the program your job will run It's often useful
# to create a shell script to "wrap" your actual work.
executable = scalingup-python-wrapper.sh

# files transferred into the job sandbox
transfer_input_files = rosen_brock_brute_opt.py

# error and output are the error and output channels from your job
# that HTCondor returns from the remote host.
output = Log/job.out.$(Cluster).$(Process)
error = Log/job.error.$(Cluster).$(Process)


# The log file is where HTCondor places information about your
# job's status, success, and resource consumption.
log = Log/job.log.$(Cluster).$(Process)

# Send the job to Held state on failure.
on_exit_hold = (ExitBySignal == True) || (ExitCode != 0)

# Periodically retry the jobs every 60 seconds, up to a maximum of 5 retries.
# The RANDOM_INTEGER(60, 600, 120) means random integers are generated between
# 60 and 600 seconds with a step size of 120 seconds. The failed jobs are
# randomly released with a spread of 1-10 minutes.  Releasing multiple jobs at
# the same time causes stress for the login node, so the random spread is a
# good approach to periodically release the failed jobs.

PeriodicRelease = ( (CurrentTime - EnteredCurrentStatus) > $RANDOM_INTEGER(60, 600, 120) ) && ((NumJobStarts < 5))

# Queue is the "start button" - it launches any jobs that have been
# specified thus far.
queue 1
We submit the DAGMan task using the command condor_submit_dag
$ condor_submit_dag jobmanagement.dag

-----------------------------------------------------------------------
File for submitting this DAG to Condor           : jobmanagement.dag.condor.sub
Log of DAGMan debugging messages                 : jobmanagement.dag.dagman.out
Log of Condor library output                     : jobmanagement.dag.lib.out
Log of Condor library error messages             : jobmanagement.dag.lib.err
Log of the life of condor_dagman itself          : jobmanagement.dag.dagman.log

Submitting job(s).
1 job(s) submitted to cluster 1317501.
-----------------------------------------------------------------------
Let's monitor the job status every two seconds.
$ watch -n2 condor_q -nobatch

-- Submitter: login01.osgconnect.net : <192.170.227.195:48781> : login01.osgconnect.net
ID      OWNER            SUBMITTED     RUN_TIME ST PRI SIZE CMD
1317646.0   username          10/30 17:27   0+00:00:28 R  0   0.3  condor_dagman
1317647.0   username          10/30 17:28   0+00:00:00 I  0   0.0  scalingup-python-w
1317647.0   username          10/30 17:28   0+00:00:00 I  0   0.0  scalingup-python-w
1317647.0   username          10/30 17:28   0+00:00:00 I  0   0.0  scalingup-python-w
1317647.0   username          10/30 17:28   0+00:00:00 I  0   0.0  scalingup-python-w

4 jobs; 0 completed, 0 removed, 4 idle, 1 running, 0 held, 0 suspended
We see five running jobs. One is the DAGMan job which manages the execution of jobs inside the DAG. The others are the jobs controlled by the DAG. We need to type Ctrl-C to exit from watch command. Once the DAG completes, the queue will be empty.
Supplying Variables to Jobs in DAGMan
Let's take this a step further. In the previous section, we wanted to supply some boundary conditions to the calulation using the argument keyword. The same is possible with DAGMan. Taking a look at jobmanagement_supplyvars.dag:
$ cat jobmanagement_supplyvars.dag

######DAG file######
##### Define Jobs ###
#####  JOB JobName JobDescriptionFile
JOB A0 run_job_vars.submit
JOB A1 run_job_vars.submit
JOB A2 run_job_vars.submit
JOB A3 run_job_vars.submit

VARS A0 x_low="-9" x_high="9" y_low="-9" y_high="9"
VARS A1 x_low="-8" x_high="8" y_low="-8" y_high="8"
VARS A2 x_low="-7" x_high="7" y_low="-7" y_high="7"
VARS A3 x_low="-6" x_high="6" y_low="-6" y_high="6"
From jobmanagement.dag, we added four lines starting with the keyword VARS. Each line follows a similar pattern to the job definition line we looked at above: VARS <unique_ID_job> <list_of_variables>. Please note that the variable values have to be in "" independent on whether they are numbers, strings, etc.
Now we take a look at run_job_vars.submit:
$cat run_job_vars.submit

# The UNIVERSE defines an execution environment. You will almost always use VANILLA.
Universe = vanilla

# These are good base requirements for your jobs on the OSG. It is specific on OS and
# OS version, core, and memory, and wants to use the software modules.
Requirements = OSGVO_OS_STRING == "RHEL 6" && TARGET.Arch == "X86_64" && HAS_MODULES == True
request_cpus = 1
request_memory = 1 GB

# executable is the program your job will run It's often useful
# to create a shell script to "wrap" your actual work.
executable = scalingup-python-wrapper.sh

# files transferred into the job sandbox
transfer_input_files = rosen_brock_brute_opt.py

# error and output are the error and output channels from your job
# that HTCondor returns from the remote host.
output = Log/job.out.$(Cluster).$(Process)
error = Log/job.error.$(Cluster).$(Process)


# The log file is where HTCondor places information about your
# job's status, success, and resource consumption.
log = Log/job.log.$(Cluster).$(Process)

# Send the job to Held state on failure.
on_exit_hold = (ExitBySignal == True) || (ExitCode != 0)

# Periodically retry the jobs every 60 seconds, up to a maximum of 5 retries.
# The RANDOM_INTEGER(60, 600, 120) means random integers are generated between
# 60 and 600 seconds with a step size of 120 seconds. The failed jobs are
# randomly released with a spread of 1-10 minutes.  Releasing multiple jobs at
# the same time causes stress for the login node, so the random spread is a
# good approach to periodically release the failed jobs.

PeriodicRelease = ( (CurrentTime - EnteredCurrentStatus) > $RANDOM_INTEGER(60, 600, 120) ) && ((NumJobStarts < 5))

# Command-line arguments passed to the executable
arguments = $(x_low) $(x_high) $(y_low) $(y_high)

# Queue is the "start button" - it launches any jobs that have been
# specified thus far.
queue 1
It is the same as run_job.submit with the added line arguments = $(x_low) $(x_high) $(y_low) $(y_high).
DAGMan Log Files
When submitting a DAGMan job, HTCondor helpfully tells you what the log files are named and what their use is:
$ condor_submit_dag jobmanagement_supplyvars.dag

-----------------------------------------------------------------------
File for submitting this DAG to Condor           : jobmanagement.dag.condor.sub
Log of DAGMan debugging messages                 : jobmanagement.dag.dagman.out
Log of Condor library output                     : jobmanagement.dag.lib.out
Log of Condor library error messages             : jobmanagement.dag.lib.err
Log of the life of condor_dagman itself          : jobmanagement.dag.dagman.log

Submitting job(s).
1 job(s) submitted to cluster 1317501.
-----------------------------------------------------------------------
The most important log here is jobmanagement.dag.dagman.out. It allows you to monitor the progress of the workflow, what jobs were just submitted, and how many jobs are at the various stages of submission, i.e. in the PRE or POST script phase, how many are Ready to be submitted, how many are waiting for other jobs to finish (Un-Ready), how many have failed or completed. Don't worry we will explain some of these terms in the following examples. Taking a look at this file:
$ cat jobmanagement.dag.dagman.out

03/08/17 16:24:57 ******************************************************
03/08/17 16:24:57 ** condor_scheduniv_exec.1171.0 (CONDOR_DAGMAN) STARTING UP
03/08/17 16:24:57 ** /usr/bin/condor_dagman
03/08/17 16:24:57 ** SubsystemInfo: name=DAGMAN type=DAGMAN(10) class=DAEMON(1)
03/08/17 16:24:57 ** Configuration: subsystem:DAGMAN local:<NONE> class:DAEMON
03/08/17 16:24:57 ** $CondorVersion: 8.4.11 Jan 24 2017 $
03/08/17 16:24:57 ** $CondorPlatform: X86_64-CentOS_6.8 $
03/08/17 16:24:57 ** PID = 1280980
03/08/17 16:24:57 ** Log last touched time unavailable (No such file or directory)
03/08/17 16:24:57 ******************************************************
03/08/17 16:24:57 Using config source: /etc/condor/condor_config
[...]
03/08/17 16:25:00 MultiLogFiles: truncating log file /share/training/osguser50/tutorial-dagman-namd/JobManagementDAG/./jobmanagement.dag.nodes.log
03/08/17 16:25:00 DAG status: 0 (DAG_STATUS_OK)
03/08/17 16:25:00 Of 4 nodes total:
03/08/17 16:25:00  Done     Pre   Queued    Post   Ready   Un-Ready   Failed
03/08/17 16:25:00   ===     ===      ===     ===     ===        ===      ===
03/08/17 16:25:00     0       0        0       0       4          0        0
03/08/17 16:25:00 0 job proc(s) currently held
03/08/17 16:25:00 Registering condor_event_timer...
03/08/17 16:25:01 Submitting Condor Node A0 job(s)...
03/08/17 16:25:01 Adding a DAGMan workflow log /share/training/osguser50/tutorial-dagman-namd/JobManagementDAG/./jobmanagement.dag.nodes.log
03/08/17 16:25:01 Masking the events recorded in the DAGMAN workflow log
03/08/17 16:25:01 Mask for workflow log is 0,1,2,4,5,7,9,10,11,12,13,16,17,24,27
03/08/17 16:25:01 submitting: /usr/local/bin/condor_submit -a dag_node_name' '=' 'A0 -a +DAGManJobId' '=' '1171 -a DAGManJobId' '=' '1171 -a submit_event_notes' '=' 'DAG' 'Node:' 'A0 -a dagman_log' '=' '/share/training/osguser50/tutorial-dagman-namd/JobManagementDAG/./jobmanagement.dag.nodes.log -a +DAGManNodesMask' '=' '"0,1,2,4,5,7,9,10,11,12,13,16,17,24,27" -a DAG_STATUS' '=' '0 -a FAILED_COUNT' '=' '0 -a +DAGParentNodeNames' '=' '"" -a notification' '=' 'never run_job.submit
03/08/17 16:25:01 From submit: Submitting job(s).
[...]
03/08/17 16:31:12 Node A2 job proc (1178.0.0) completed successfully.
03/08/17 16:31:12 Node A2 job completed
03/08/17 16:31:12 Event: ULOG_EXECUTE for Condor Node A3 (1179.0.0)
03/08/17 16:31:12 Number of idle job procs: 0
03/08/17 16:31:12 DAG status: 0 (DAG_STATUS_OK)
03/08/17 16:31:12 Of 4 nodes total:
03/08/17 16:31:12  Done     Pre   Queued    Post   Ready   Un-Ready   Failed
03/08/17 16:31:12   ===     ===      ===     ===     ===        ===      ===
03/08/17 16:31:12     3       0        1       0       0          0        0
03/08/17 16:31:12 0 job proc(s) currently held
03/08/17 16:31:17 Currently monitoring 1 Condor log file(s)
03/08/17 16:31:17 Event: ULOG_JOB_TERMINATED for Condor Node A3 (1179.0.0)
03/08/17 16:31:17 Number of idle job procs: 0
03/08/17 16:31:17 Node A3 job proc (1179.0.0) completed successfully.
03/08/17 16:31:17 Node A3 job completed
03/08/17 16:31:17 DAG status: 0 (DAG_STATUS_OK)
03/08/17 16:31:17 Of 4 nodes total:
03/08/17 16:31:17  Done     Pre   Queued    Post   Ready   Un-Ready   Failed
03/08/17 16:31:17   ===     ===      ===     ===     ===        ===      ===
03/08/17 16:31:17     4       0        0       0       0          0        0
03/08/17 16:31:17 0 job proc(s) currently held
03/08/17 16:31:17 All jobs Completed!
03/08/17 16:31:17 Note: 0 total job deferrals because of -MaxJobs limit (0)
03/08/17 16:31:17 Note: 0 total job deferrals because of -MaxIdle limit (1000)
03/08/17 16:31:17 Note: 0 total job deferrals because of node category throttles
03/08/17 16:31:17 Note: 0 total PRE script deferrals because of -MaxPre limit (20) or D
[...]
03/08/17 16:31:17 **** condor_scheduniv_exec.1171.0 (condor_DAGMAN) pid 1281465 EXITING WITH STATUS 0
Job Retry and Rescue
In the above examples, we use an independent set of jobs. What happens if any of these jobs fail? DAGMan can help with the resubmission of uncompleted portions of a DAG, when one or more nodes result in failure.
Job Retry
Say for example, job A2 in the above example is important and you want to eliminate the possibility as much as possible. One way is to retry the specific job A2 a few times. DAGMan would retry failed jobs when you specify the following line at the end of dag file:
$ nano jobmanagement.dag # Open the jobmanagement.dag file
At the end of the jobmanagement.dag file
Retry A2 3 # This means re-try job A2 for three times in case of failures.
If you want to retry jobs A2 and A3 for 7 times, edit the jobmanagement.dag:
### At the end of the linear.dag file
Retry A2 7 # This means re-try job A2 for up to seven times in case of failures.
Retry A3 7 # This means re-try job A3 for up to seven times in case of failures.
Rescue DAG
If DAGMan fails to complete the list of tasks, it creates a rescue DAG file with a suffix .rescueXXX, where XXX is a number starting at 001. The rescue DAG file contains the information about which jobs have completed and which have failed or haven't completed. Say for example, in our workflow of four linear jobs, the jobs A0 and A1 finished, A2 failed, and A3 is incomplete. In such a case, we do not want to start executing the jobs all over again but rather we want to start from A2. This information is embedded in the rescue DAG file. In our example of linear.dag, the rescue DAG file would be linear.dag.rescue001. We re-submit the DAG:
$ condor_submit_dag jobmanagement.dag
and HTCondor will automatically detect the rescue DAG and use it to only submit the jobs that have yet to sucessfully complete.
Submission Tuning
One additional feature of DAGMan is that you are able to tune how many total jobs to have sitting in the queue or how fast jobs are submitted to the cluster. This is especially important if you have fairly large number of jobs. To accomodate other users on the OSG Connect system and reduce stress on the system, we recommend that you keep less than 10,000 jobs in the queue in the idle state.
DAGMan can be configured to allow you operate within those limits. The simplest way is to pass a text file with your configuration parameters to condor_submit_dag: condor_submit_dag -config dagman.config your_dag.dag. The configuration file will look something like:
DAGMAN_MAX_JOBS_IDLE=1000
DAGMAN_USER_LOG_SCAN_INTERVAL=1
DAGMAN_MAX_SUBMITS_PER_INTERVAL=10
DAGMAN_MAX_JOBS_IDLE tells your DAGMan job to limit the maximum number of jobs that are sitting in the queue to be 1000. DAGMAN_USER_LOG_SCAN_INTERVAL tells your DAGMan how often to look for a changed job state, i.e. that a job failed or completed. DAGMAN_MAX_SUBMITS_PER_INTERVAL is to tune how many jobs DAGMan submits every interval. The last two variables are for tuning how rapidly and how many jobs are submitted. For more configuration parameters and their documentation, go here
Managing Job Interdependecy with DAGMan
In our second example, we will use four MD simulations that have some level of job interdependence.
Linear DAG
A linear job dependence means that they will be submitted sequentially by HTCondor. For the sake of simplicity, we have artifically reduced the number of computation steps for each simulation.
Instead of running the four jobs from the above example independently, we want to run them sequentially, i.e. A0-->A1-->A2-->A3. In these calculations, the output files from the job A0 serves as an input for the job A1 and so forth. These set of jobs clearly represents an acyclic graph. In DAGMan language, job A0 is parent of job A1, job A1 is parent of A2 and job A2 is parent of A3.
First:
$ cd ../LinearDAG
Let us take a look at the DAG file linear.dag.
$ cat linear.dag

######DAG file######
##### Define Jobs ###
#####  JOB JobName JobDescriptionFile
JOB A0 namd_run_job0.submit
JOB A1 namd_run_job1.submit
JOB A2 namd_run_job2.submit
JOB A3 namd_run_job3.submit

##### Relationship between Jobs ###
##### PARENT JobName CHILD JobName
PARENT A0 CHILD A1
PARENT A1 CHILD A2
PARENT A2 CHILD A3
The file looks similar to the one used for the no dependency example above. The main addition are the last three lines containing the definition of the job interdependency. The PARENT and CHILD commands describes the dependency between jobs, where a job(s) following the PARENT command need to successfully complete before jobs following CHILD command are submitted.
If we now submit the DAG:
$ condor_submit_dag linear.dag

-----------------------------------------------------------------------
File for submitting this DAG to Condor           : nodependency.dag.condor.sub
Log of DAGMan debugging messages                 : nodependency.dag.dagman.out
Log of Condor library output                     : nodependency.dag.lib.out
Log of Condor library error messages             : nodependency.dag.lib.err
Log of the life of condor_dagman itself          : nodependency.dag.dagman.log

Submitting job(s).
1 job(s) submitted to cluster 1317501.
-----------------------------------------------------------------------
Let's monitor the job status every two seconds.
$ watch -n2 condor_q -nobatch

-- Submitter: login01.osgconnect.net : <192.170.227.195:48781> : login01.osgconnect.net
ID      OWNER            SUBMITTED     RUN_TIME ST PRI SIZE CMD
1317646.0   username          10/30 17:27   0+00:00:28 R  0   0.3  condor_dagman
1317647.0   username          10/30 17:28   0+00:00:00 I  0   0.0  namd_run_job0.sh

2 jobs; 0 completed, 0 removed, 4 idle, 1 running, 0 held, 0 suspended
Only two jobs are running now: the DAGMan job and the top-level parent, i.e. job A0. A1 through A3 will have to wait until their parent job(s) have completed before the are executed.
PRE and POST processing of jobs
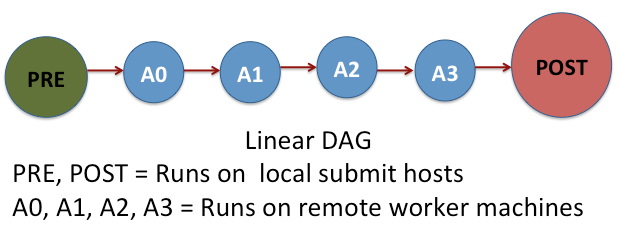
Sometimes, we need to perform a task before a job is submitted or after it is completed. Such pre-processing and post-processing are handled in DAGMan via SCRIPT command. Now let us see how this work for the linear DAG of NAMD jobs.
$ cd ../LinearDAG-PrePost
$ cat linear_prepost.dag

######DAG file######
##### Define Jobs ###
#####  JOB JobName JobDescriptionFile
JOB A0 namd_run_job0.submit
JOB A1 namd_run_job1.submit
JOB A2 namd_run_job2.submit
JOB A3 namd_run_job3.submit

##### Relationship between Jobs ###
##### PARENT JobName CHILD JobName
PARENT A0 CHILD A1
PARENT A1 CHILD A2
PARENT A2 CHILD A3

##### PRE or POST processing of a job
##### SCRIPT PRE/POST JobName ProcessScript
SCRIPT PRE   A0  pre-script-temperature.sh
SCRIPT POST  A3  post-script-energy.sh
Except the last four lines block, this DAG file linear-post.dag is same as the previous DAG file linear.dag. The script block specifies a pre script and/or post script and which job they are associated with.
The pre script pre-script-temperature.sh sets the temperature for the simulations and it is processed before the job A0. This means the pre script is the first thing processed before any job is submitted. The post script post-script-energy.sh runs after finishing all the simulation jobs A0, A1, A2, and A3. It extracts the energy values from the simulation results. Both pre and post scripts are executed on the local submit machines and not on a remote worker. These scripts should be as lightweight processes as possible.
Parallel DAG
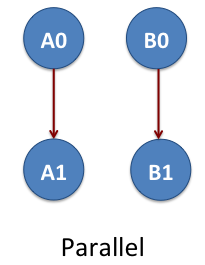
Now we consider the workflow of two-linear set of jobs A0, A1, B0 and B1. Again these are NAMD jobs. The job A0 is parent of A1 and the job B0 is the parent of B1. The jobs A0 and A1 do not depend on B0 and/or B1. This means we have two parallel workflows that are represented as A0->A1 and B0->B1. The arrow shows the order of job execution. This example is located at
$ cd tutorial-dagman-namd/TwoLinearDAG
The directory contains the input files, job submission files and execution scripts. What is missing here is the .dag file. See if you can write the DAGfile for this example and submit the job.
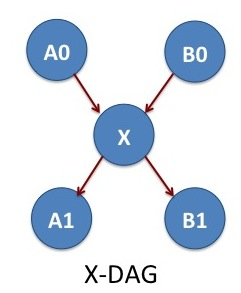
X-DAG
We consider one more example workflow that allows the cross communication between two parallel pipelines. The jobs A0 and B0 are two independent NAMD simulations. After finishing A0 and B0, we do some analysis with the job X. The jobs A1 and B1 are two MD simulations independent of each other. The X job determines what is the simulation temperature of MD simulations A1 and B1. In DAGMan lingo, X is the parent of A1 and B1.
The input files, job submission files and execution scripts of the jobs are located in the X-DAG subdirectory:
$ cd tutorial-dagman-namd/X-DAG
Again we are missing the .dag file here. See if you can write the DAG file for this example. Hint: Does the job in the center actually need to do anything (is it a NOOP in programming speak)? Check the DAGMan docs!
Challenges
- What happens if you introduce a cycle in a DAG? Modify one of the
.dagfiles and see what happens. Do you get an error at submit time? How about in the.dag.dagman.outfile?
Key Points
- DAGMan handles computational jobs that are mapped as a directed acyclic graph.
condor_submit_dagis the command to submit a DAGMan task.- Job Retry and Job Rescue mechanism in DAGMan are helpful when running a complex workflow